How to Create Meta Ads: From Graphic to Live Ad
The short answer
A Meta ad is a graphic or a video, a few lines of text and a setup in Ads Manager. Tutorials spend most of their time on the setup. The graphic decides most of the result, and it is the part you control completely. The whole path has seven steps:
- Pick one goal.
- Pick a format: single image or carousel.
- Design one message per ad.
- Write the primary text and the headline, and choose the button.
- Export the right sizes: 4:5 for Feed, 9:16 for Stories and Reels.
- Build the ad in Ads Manager and preview every placement.
- Test three versions and keep the winner.
This guide covers all seven, with the most detail where beginners lose money: the graphic and the export. Targeting, budgets and bidding are Meta's territory and change often, so Meta's own help pages are the better source for those. If you are looking for how to create paid ads on other platforms, the same seven steps apply there, with different sizes (see the end of this guide).
Step 1: Pick one goal
Ads Manager asks for an objective first. Meta offers six: Awareness, Traffic, Engagement, Leads, App promotion and Sales. Pick the one that matches the single thing you want a person to do after seeing the ad.
- Awareness: people remember your brand. The graphic needs a clear logo and one strong image.
- Traffic: people visit a page. The graphic needs a hook and a reason to click.
- Leads: people leave their details or send a message. The graphic needs an offer.
- Sales: people buy. The graphic needs the product and a reason to trust you. A sales campaign that optimizes for purchases needs tracking on your site, the Meta Pixel or the Conversions API, so set that up first.
Engagement and App promotion follow the same logic. If you are unsure, Traffic is the simplest start.
Step 2: Pick a format
For graphics there are two formats: a single image and a carousel. Video and collection ads exist too, and they need other assets.
| Format | Use it when | Assets |
|---|---|---|
| Single image | You have one message, one offer or one product | One 4:5 file for Feed and one 9:16 file for Stories and Reels |
| Carousel | You have several products, steps or reasons, or want to tell a short story | 2 to 10 cards, all in the same ratio |
The first card of a carousel has to do the work of a single image ad, because many people never swipe. Make it strong enough to stand alone. Ratios, pixels and safe zones for both formats are in our Meta ad sizes guide.
Step 3: Design one message per ad
People scroll past dozens of posts a minute. Your graphic gets a fraction of a second, so it needs one idea that is clear at a glance. These rules hold up in every industry:
- One message. If you want to say three things, make three ads.
- A hook in the top half. A short headline, a number or a face. Five to eight words is plenty.
- One focal point. One photo or one big word, not a collage of both.
- Readable text. On a 1080 pixel wide canvas, keep the smallest text at 36 pixels and headlines at 80 pixels or more.
- Strong contrast. Light text on a dark area or the other way round. Check white text on a gray photo twice.
- Your brand, small. A logo and one brand color make an ad recognizable. A giant logo makes it look like an ad, and people scroll past ads.
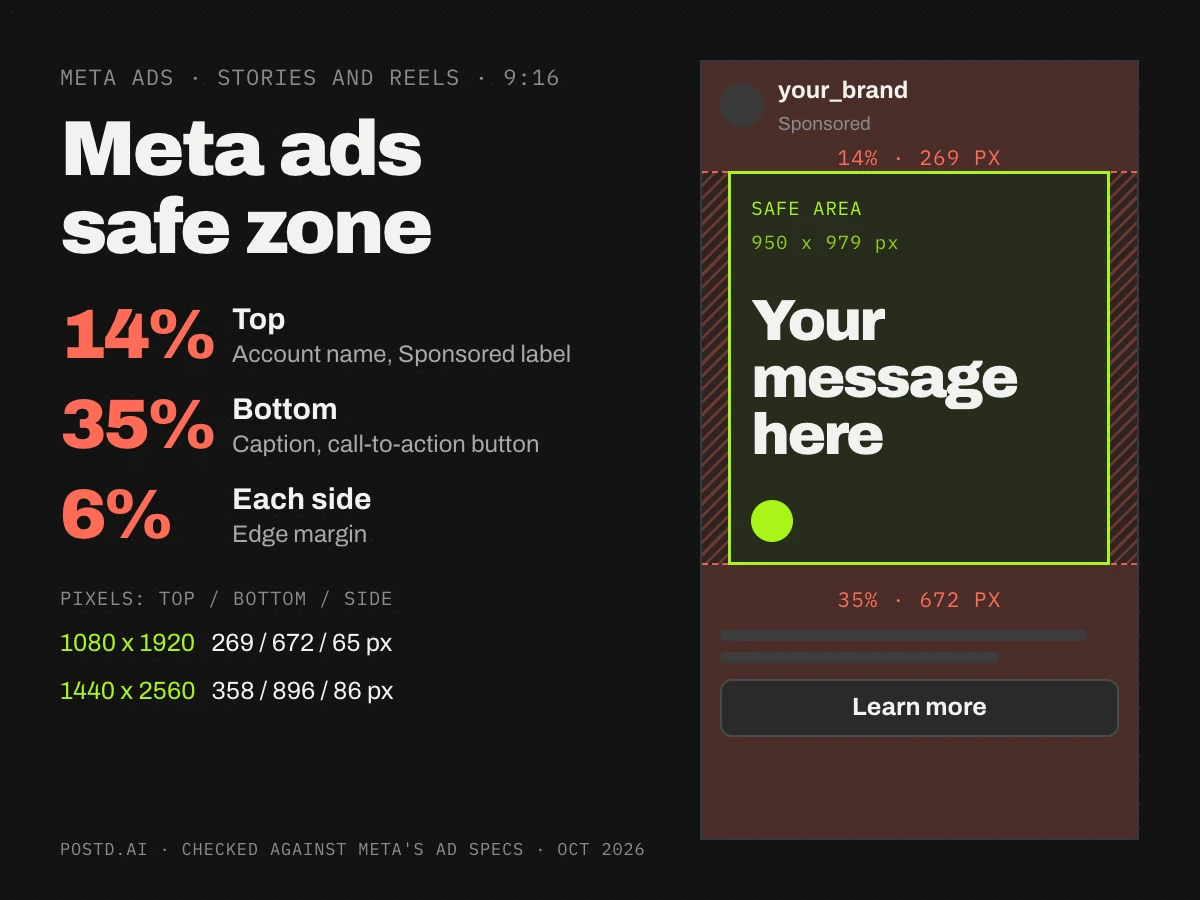
- Room for Meta's interface. In 9:16, keep the bottom 35 percent and the top 14 percent free of key elements.
A quick test: show the ad to someone for three seconds, then take it away. Can they tell you what it is, who it is for and what to do next? If not, simplify. Eight proven layouts with wireframes are in our guide to paid ad graphics.
Step 4: Write the text
Every ad has four text parts:
- Primary text: sits above or below the image, depending on the placement. Make the first 125 characters count, because longer text is cut with a "See more" link.
- Headline: the bold line near the button. Short and concrete, about 40 characters or fewer.
- Description: optional and often hidden on phones. Put nothing essential there.
- Button: Meta offers a fixed list, for example Shop now, Learn more, Sign up, Book now and Contact us. Pick the one that matches the next step.
The graphic and the text should not repeat each other. Let the image carry the hook and the text carry the detail. A simple structure for the primary text: the problem in one line, the solution in one line, one piece of proof, then the call to action. Meta lets you add several versions of each text field. Add two or three, and Meta tests the combinations.
Step 5: Export the right sizes
Export two files per idea: 4:5 for Feed and 9:16 for Stories and Reels. For a carousel, export every card in the same ratio. JPG suits photos. PNG suits flat graphics with sharp text edges, as long as the file stays under 30 MB. Name the files so you can find them again, for example brand_offer-v1_4x5.jpg.
Before you upload, look at the file on a real phone. Text that looks fine on a desktop is often too small at phone size.
Step 6: Build the ad in Ads Manager
Meta renames menu items from time to time. The order stays the same:
- Open Ads Manager and click Create. Choose the objective from step 1.
- On the ad set level, set the audience, the placements, the budget and the schedule. Meta recommends Advantage+ placements, which let Meta decide where the ad runs.
- On the ad level, choose the Facebook Page and the Instagram account the ad runs as.
- Choose the format, upload your 4:5 file, and add the primary text, the headline, the button and the destination URL. Add UTM parameters to the URL so your analytics show where each visit came from.
- To control Stories and Reels, customize the assets by placement and upload the 9:16 file there.
- Open the preview and check every placement. Look for text under the button and for anything cut at the edges.
- Publish. Meta reviews each ad, which usually takes up to a day.
Step 7: Test three versions
Change one thing at a time: the headline, the image or the offer. Start with three versions in one ad set, and give Meta time before you judge. Meta's delivery system learns from results, and an ad set needs about 50 results in a week to leave the learning phase (Meta's explanation). With small budgets that takes longer. Avoid editing a running ad set every day, because larger edits restart the learning.
Judge by cost per result. A graphic that gets many cheap clicks and no sales is a bad ad.
Boost a post or create an ad?
You can turn an existing Instagram or Facebook post into an ad in two ways. Boosting is the quick version: pick a post, set a goal, an audience and a budget, done. Ads Manager is the full version, with more objectives, more control over placements and text, and proper testing. A post that already works organically is a good candidate for an ad, and in Ads Manager you can reuse it as an existing post. Check the format and the caption first, because a post written for followers is not always a good ad.
The other direction works as well. Design the graphic once with ad sizes and safe zones in mind, and you can publish it organically and as an ad.
Making the graphic in Postd
Postd covers step 3 and step 5. You set your brand once, with colors, fonts and logo. You pick a format, 4:5, 9:16 or a custom size, drop in a photo and type the message. The contrast guard warns when text gets hard to read, and the export gives you JPG files at the right ratio, numbered for carousels. For product photos, background removal runs in your browser, so a product can sit on a plain color. When a client or a colleague has to approve the ad, a share link shows the slides on any device before anything goes live.
Postd does not connect to Ads Manager and does not run campaigns. You upload the exported files yourself.
The same graphic on other platforms
The process works for any paid social platform, and only the sizes change. TikTok ads use 9:16. Pinterest uses 2:3. LinkedIn commonly uses 1.91:1 or 1:1. Check each platform's own spec page before you export, because these numbers change.
Mistakes that waste budget
- One 4:5 file for every placement, with the headline in the area that Stories covers.
- Three messages in one ad.
- Text smaller than a phone can show.
- No UTM parameters, so nobody can tell which ad worked.
- Judging a test after one day.
- Changing everything at once, so nothing can be learned.
FAQ
How do I create my first Meta ad?
Pick a goal, choose a single image or a carousel, design one message, write the texts, export a 4:5 and a 9:16 file, build the ad in Ads Manager and test three versions.
What size should a Meta ad graphic be?
4:5 for Feed and 9:16 for Stories and Reels. Meta recommends 1440 x 1800 and 1440 x 2560 pixels, and 1080 x 1350 and 1080 x 1920 are accepted.
Can I use an Instagram post as an ad?
Yes. You can boost it from the app or reuse it in Ads Manager as an existing post. Check the format and the caption first, because a post written for followers is not always a good ad.
How many ad versions should I test?
Start with three. Change one element at a time and give each version enough budget to produce results.
Can Postd upload ads to Meta for me?
No. Postd designs and exports the graphics. You upload the files in Ads Manager.
Next
Sizes and safe zones: Meta ad sizes and creative assets. Layouts: eight paid ad graphics. Tools: Meta ads generator, what it does and skips. When the graphic is ready, open the editor, or check the pricing page for what each plan includes.